Home-Built Catquiver
Simple, light and effective. What more could a guy ask for?
Materials
4 Aluminum arrow shafts
1 qt plastic oil can ( small quiver ) or 1 gal plastic antifreeze jug ( large quiver )
Single-gang plastic outlet box ( small quiver ) or triple-gang plastic outlet box ( large quiver )
One pair elastic suspenders ( as wide as you can find )
4 1 1/4" drywall screws
4 #6 panhead self-drilling screws
4 #6 fender washers
2" x 4" scrap plywood
1 foot dowel rod ( size varies, see text )
2" foam rubber ( about 3" by 7" )
5 minute epoxy
Spray paint
You will need four aluminum arrows shafts for the project. I suggest you don't use new ones, unless you just have them laying around. Try going to your local pro shop or indoor range and asking if they have a broken arrow box. Get the thickest-walled, heaviest spine shafts you can. 2219's and 2317's work well. If you can find shafts with 20" of straight, unkinked shaft, that's all you'll need.
Use a 3" piece of dowel rod and the five-minute epoxy to join two of the shafts to make one long one. Do this with all four pieces. you now have two shafts, approximately 40" long. If you can, use the factory-cut ends of the shafts to join. If not, be sure your cuts are smooth and square. Otherwise, the resulting long shafts won't be straight. Glue a 1" section of dowel into each end of the two shafts. This gives us something to attach to when we add the hood and broadhead hood assemblies. Now measure one of your broadhead arrows from the top of the nock to the point of the broadhead. Add 1 1/2". Cut your two long shafts to this length and set them aside.
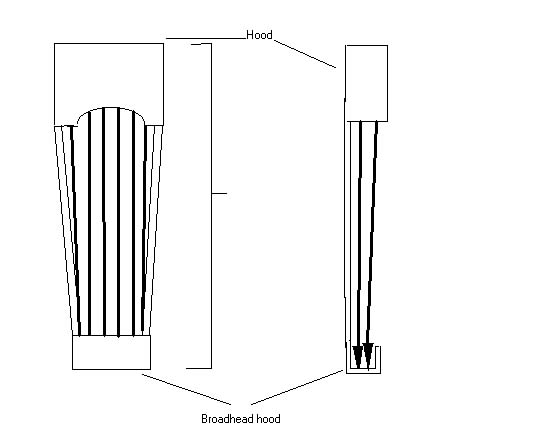
Next comes the hood. You'll notice the materials list gives you the option of an oil can or antifreeze jug. That's because you can make this quiver in two sizes, and it's time to decide which you want. The antifreeze jug will give you a seven or eight arrow quiver. The smaller oil can will give you a four arrow capacity, and is extremely light. Whichever you decide on, be sure it is empty, then wash with hot water and soap, followed by a triple-rinse of hot water. Cut off the top of the container, just below the handle. If you like, you can also cut a shallow half-circle in one of the long sides of the container. I usually do, as I think it makes for a nicer-looking quiver.
Now we'll do the broadhead hood for the base of the quiver. Take the single-gang outlet box (if you're making the small quiver) or the triple-gang outlet box ( for the large quiver) and cut both f the shorter ends off, so that you end up with a squared-off "U" shape. Cut the scrap of plywood to fit tightly into the bottom of the "U" and epoxy it into place. Measure up three inches from this plywood floor and mark a line all the way across the front and back of the "U". Cut along this line, leaving you with a "U" shaped assembly three inches in height, with a plywood bottom.
Let's assemble the quiver. Take the hood, and drill two small holes at the back corners. If you cut a half-circle in one side of the hood, be sure these holes are against the opposite wall of the hood. Your hole should go through what was the bottom of the container, about half the diameter of the aluminum shafts you are using away from the back wall of the container. Drill two small holes in the dowels stuck into the ends of your arrow shafts, then use two drywall screws through the holes into the hood and into the holes in the dowels. This will secure the hood to the shafts. Do the same for the broadhead hood. Be sure to put the pilot holes very close to one wall of the hood, so that when you attach the shafts they lay tight against one side. Use the drywall screws to secure the broadhead hood to the shafts.
Starting to look like a quiver, isn't it? You should now have the hood and broadhead hood attached by two shafts, with the shafts laying tight against one wall of the hood and broadhead hood. If everything looks good, take an hour or so to spray-paint the quiver in your favorite camo pattern.
All that's left is to attach some strap to allow you to keep the quiver on your back. Cut the suspenders you bough apart, removing all hardware and with the aim of ending up with two long straps. Use a hot nail to poke a hole through one end of both of the straps, about 3/4" in from the very end. Use two of the panhead screws with a washer on them to go through the strap holes an into the quiver hood, about 1/2" above the bottom edge of the hood and centered over the shafts. You will find it helpful to predrill the holes through the hood into the shafts, but take care not to make these holes too large. You want the screws to have lots of bite on the soft aluminum shafts. The bottom attaches a little differently. Pull the straps down so they just lay along the shafts. Measure up about eight inches from the broadhead hood and mark the strap. Cut the strap to this length. Again, use a hot nail to poke a hole through the shaft about 3/4" from the end. Run a short piece of leather lacing around the shaft and bring both ends through the hole you just made in the bottom end of the strap. Tie this off in a knot big enough that it won't pull back through the hole.
Cut the foam rubber so that it will just slide into the quiver hood, and push it all the way to the top. If you like, you can buckle a fanny pack around the hood for a pouch, or glue it on with hot melt glue. You can also carry a water bottle by using small hose clamps to attach a bicycle water bottle holder to one of the shafts. Load the quiver with arrows, staggering the feathered ends inside the hood to prevent matting, and head for the woods!