Homemade Bowfishing Gear
Commercial gear is expensive, and really doesn’t work all that well. Here’s some easy to make bowfishing gear that does what you need it to.
Materials
5 gallon plastic bucket
2 small ‘L’ brackets
Black electricians tape
Commercial bowfishing line
Heavy hardwood arrow shafts or heavy-walled aluminum shafts
6D common nails
Pop rivets
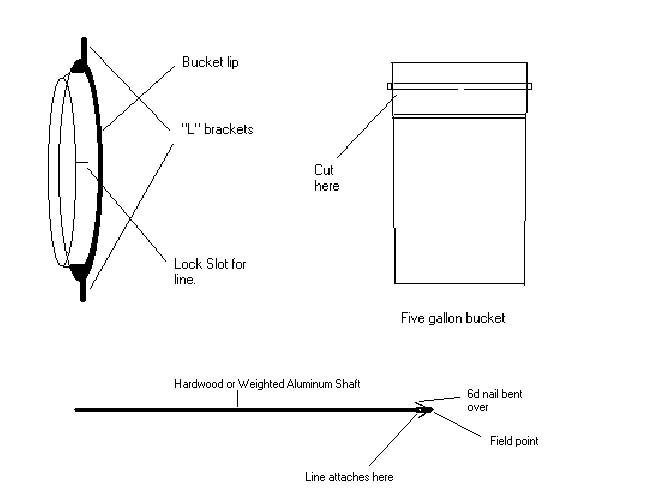
First let’s put together a reel. The reel I prefer is a shoot-through style. They are much faster to retrieve and don’t interfere with arrow flight the way a stabilizer reel can. Take the five gallon bucket and cut off the top two inches. If you can, make your cut right behind a ridge in the bucket. This gives you a flange for the back of the reel to prevent the line slipping off the wrong side. Now, attach the "L" brackets to opposite sides of the reel. Do this by drilling a hole in one leg of the "L" and a corresponding hole through the cut-off top of the bucket. Attach the "L" brackets with pop rivets, so that the leg not fastened to the bucket top point in opposite directions. Wrap the protruding leg of the "L" brackets with black electricians tape to save scratches on your bow. Make two straps to attach the reel by taking a long piece of black electricians tape ( about eighteen inches will do ) and doubling over three inches or so around the "L" brackets. Now you have a strip of tape with the first three inches stuck back to the remaining tape. This will keep the finish of your bow from being damaged by the adhesive. Last, cut a slot in the edge of the reel with a pair of side-cutters or a good knife. When you load an arrow, you clip the line into this slot to keep it from unwinding until you shoot. Put the reel on the bow so that this slot is opposite your bow hand. That is, if you shoot right-handed, the slot should be on the right-hand edge of the reel. This way, when you cant the bow, the line between the arrow and the slot will fall free of your body instead of tangling you up.
Next, we need some arrows. I don’t like commercial fiberglass arrows. They are too heavy, and fly like logs. I use either a hardwood shaft or a weighted aluminum shaft. Ash works well, hickory is better. For aluminum, go up one spine class in shafts (get the thickest-walled shaft you can, as thin-walled shafts won’t take the abuse) , cut them to your normal length, and cut a piece or two of aquarium tubing that will fit down the length of the shaft to bring the weight up. What you are looking for is an 800-900 grain shaft. If the aquarium tubing doesn’t get you there, you can install a point insert in the shaft, then drill a small hole in the bottom of the insert and fill the shaft with mineral oil. Homemade fishing points are easy to make. Drill two holes through a field point mounted on your choice of shafts, 90 degrees to one another. You’ll use the back hole to tie off your bowfishing line, so smooth it out carefully with a small file or rolled-up sandpaper. The front hole is for the barb. Make the barb by cutting the head off of a 6D nail, feeding it through the forward hole in the field point, then bending the protruding ends back at about a thirty degree angle. This barb will reverse to allow you to remove it from fish. Use a file to sharpen the tip of the field point to a needle point.
That’s it! It’s a good idea to carry a set of pliers with you to straighten out barbs that have hit rocks. Slip on an old pair of tennis shoes, put a fillet knife in your pocket, and head for the beach!