![]()
![]()
![]()
|
"THE" Quiver Jeff Strubberg Of all the equipment we carry with us into the deer woods, quivers are one of the most necessary items. They’re also just about the most annoying. Fletchings catch on every tree and bush. Getting an arrow out requires game-flagging movement. Weight on your feather-light bow or a clunky contraption on your back. Can’t live with ‘em.... So, what’s the solution? I doubt there is such a thing as the perfect quiver. But, if you use wooden arrows, two blade broadheads and are comfortable with around a four arrow capacity, here’s one that comes close. It’s cheap to make, quiet in the woods and protects your arrow from broadheads to fletching. I've included two sketches to try and make things clearer. I originally got the idea for this quiver design from Jay Massey's section of The Traditional Bowyer's Bible, Volume Two. If you don't own these books already, do yourself a favor and buy them. They'll light your do-it-yourself fires like nothing else. The supplies list is short. You’ll need about five square feet of leather. I used what is known double-split leather. It has a suede finish on both sides. Not only is this the cheapest type of leather you can buy, but the soft texture on the inside surface holds your arrows securely, while the soft outer surface quiets those unexpected brushes with tree limbs and such. Leather is classified by it's thickness. I used a 3-4 oz. thickness, which is about twice the thickness of a credit card. Look through your local Tandy Leather bargain bin. I bought the leather for this quiver out of the bargain bin and got enough material to make myself and all three of my children Lakota quivers for $12. You can use brain-tanned or any other leather that is fairly soft. You'll also need a broken arrow shaft ( one of those that snapped off just behind the point is perfect ) and something to stitch with. Artificial sinew or waxed cotton string works well. A small piece of leather lacing ( about 10 inches or so ) will make the strap of your quiver adjustable. |
|
|
|
|
|
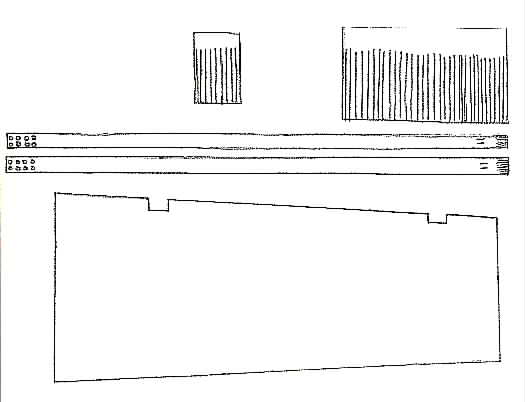
Let's get started. On the first sketch the width of the quiver body is 11 inches at the top and 9 inches at the bottom. This will give you a quiver that will comfortably hold about five arrows. Raise both measurement by two inches if you want to carry seven or so. Take one of your field-pointed arrows and measure it's total length, from the end of the pile to the tip of the nock. This is the correct length of the quiver body. When you add a broadhead to your arrow, only the nocks will protrude from the quiver, providing full protection for your arrow and easy access. Lay out the pattern of the quiver body on your leather carefully, keeping the top and bottom lines as square as possible. To achieve this, I mark the bottom of the quiver as a baseline. Find the center of this baseline and use a square to extend a line the length of your quiver body. Then use the square to extend a line out either direction from the top of this line to mark the top of the quiver. Then use a straightedge to extend a line from each end of the top dimension to the same edge of the bottom dimension. The layout of the quiver body is complete. The other pieces in the illustration will be adjusted in size to match the quiver body, with the exception of the strap. The larger piece of fringe should be cut the same length as the top dimension of the quiver body ( eleven inches in this example ). The smaller fringe should be cut one inch less than half the bottom dimension of the quiver body ( for this example, four inches ). Cut the two pieces of the carry strap to a comfortable width and 30 inches long ( I used 1 1/4 inches ). The strap is going to seem too long, but trust me on this one and leave it alone.
Lay out all these pieces and cut them out. On lightweight leather like this, a sharp pair of scissors works fine. After you've got it all cut out, fringe the pieces for the top and bottom of the quiver. Leave about an inch along the long axis of each piece unfringed to give you something to stitch to. Next you need to cut two slots in the quiver body to accept the ends of the carry strap. At five inches from either end of the quiver body ( the long edge), cut a square slot about 1 1/2" deep and an eighth of an inch wider than your carry strap.
The last step before stitching up the quiver is to punch holes for the adjustment in the carry strap and slots to attach the carry strap to the stiffener inside the quiver body. Punch a series of holes in each section of the carry strap near one end. Make these holes in pairs with the pairs about an inch apart. Four pairs on each section will do it. On the opposite end on the strap sections, cut two vertical 1/2" slots about 3 inches from the ends, about 1/4" apart. Fringe the bottom two inches of the slotted ends.
That's all the preliminaries! Let's start stitching!
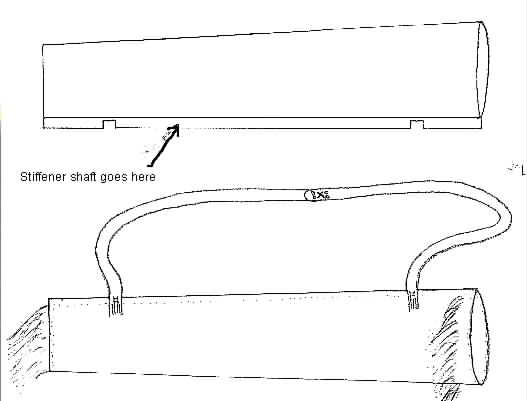 s
s
Stitch the back edge of the quiver first. Double over the quiver body with the unfringed section of the small piece of fringe inside and the fringed section out. Make sure the full length of the tabs you cut for the carry strap are showing at the top of the quiver. Stitch from the folded corner of the quiver up to the unstitched edge about a half inch in from the back end of the quiver body. Make sure your stitching passes all the way through both sides of the quiver body and the fringe base in between. Next we need to stitch the stiffener ( recycled arrow ) into the top edge of the quiver body. Slide the stiffener through the slots in the two carry strap sections so that the 1/4" piece between the slots ends up one one side of the stiffener while the remainder of the strap is on the other side of the shaft. Now position the stiffener on the quiver body so that it lays down the SINGLE layer of leather at the top with the carry strap ends in the square slot cutouts. Fold the top edge of the quiver over the stiffener. Pull the dangling ends of the carry strap out so they lay down the front of the quiver body. Start stitching the top of the quiver shut. You should be going through three layers of leather at this point, the two pieces making up the quiver body and the layer going over the stiffener. Don't stitch down the fringe on the ends of your carry strap! You'll notice that this thing is really starting to look like a quiver now. Next, attach the longer section of fringe to the front edge of the quiver. Just line the unfringed base up with the mouth of the quiver and stitch it tight. My quiver makes the feathers rustle slightly as they begin to come out of the quiver. You may want to glue or stitch a piece of felt inside the mouth of the quiver to solve this problem.
All that's left is to adjust the carry strap to fit you with the lacing. Pass the lacing through four of the strap holes to link the two pieces together. If the strap is too long, pull the lacing and move the ends of the straps together and relace. Enjoy the new quiver YOU built, and good hunting!